Showing posts with label MOO2 formulae. Show all posts

2.1.06

The MOO2 map generator

Some time ago I collected a lot of statistics about the map generator used in Master of Orion 2. Using some custom tools to dump game map data, and a lot of savegames of just started games, I gathered some data that could be used to understand how it works.

This is mostly statistical analysis, made with several assumptions to simplify the math; my assumptions seem to match the collected data, but Im not completely sure they are valid. First, some basic premises:

  • I assume that the number of players in the game does not affect the map generation
  • I assume that information about players (race, color, whatever) does not affect the map generation, except for obvious things like homeworld climate, size and gravity.
  • I assume that game difficulty does not affect the map generation


OK. First step in the map generation seems to be star layout. Black holes are considered like another star kind for this purpose. The number of stars depends on the map size in this way:

  • small: 20 stars or bh
  • medium: 36 stars or bh
  • large: 54 stars or bh
  • huge: 71 stars or bh


The above are averages. I expected 72 for huge galazies, but the result was 71. The numbers above are averages. There is a small variation of 1 or 2 stars, but I didn't measure that. The galaxy map has a physical proportion of 1.4 to 1 (i.e., 10 parsecs tool for each 14 parsecs wide). I didn't have a tool to measure sizes, but from some gameplay I have the following approximations:

  • small: 20 parsecs wide
  • medium: 27 parsecs wide
  • large: 33 parsecs wide
  • huge: 38 parsecs wide


After that, I assumed that galactic size does not affect the map generation in any other way. I might be wrong on this. The following data were all collected in huge galaxies, with 8 player games.

MOO2 stars have a size which doesn't seem to affect gameplay or anything else about the star or its planets. It just gives some stars that look bigger or smaller in the game display. Anyway, the data is in the savegame, and I've got 26.5% small stars, 44.5% medium stars, and 29% large stars. That was a small sample, I'm guessing that the right numbers, assuming the developers used simple rules for random generation (they seem to have done that in several similar places) are 30%, 40% and 30%.

Stars are assigned specials (like pirate caches, wormholes, lost hero). Note that
each star can have at least one special, so you will never find a lost hero at the endpoint of a wormhole. One possible star special is the "Planet special", which means that one planet in the system will get something like artifacts, splinter colony, natives, etc. Note that only one planet will have this, and in this case the star will not get any other special. This can be deduced from the savegame format, it is not just statistical analysis

The probabilities for different kind of specials seems to be independent of any other consideration (this is half a guess, so might be wrong again). Assuming that, the vaules are:

  • 78% No special
  • 10% Any Planet special
  • 5% Wormhole
  • ~2% Ship Debris
  • ~2% Pirate cache
  • ~2% Lost hero


There is also the "Orion special" which will be set in exactly one star system called Orion, of course. I don't know if all planet specials have the same chance of appearing or not.

Another part of star generation is setting their colors (and setting some of them as blackholes). This depends on the galactic age. According to that, the chances are:

For average aged galaxies

  • Black hole: 4%
  • Blue-white: 10.5%
  • White: 14.5%
  • Yellow: 13.6%
  • Orange: 14.4%
  • Red: 40.4%
  • Brown: 2.6%


For organic rich galaxies

  • Black hole: 7%
  • Blue-white: 4%
  • White: 4%
  • Yellow: 30.5%
  • Orange: 19.5%
  • Red: 32.7%
  • Brown: 2.3%


For mineral rich galaxies

  • Black hole: 3%
  • Blue-white: 18.5%
  • White: 22%
  • Yellow: 9.7%
  • Orange: 8.9%
  • Red: 37.2%
  • Brown: 0.7%


After creating stars and setting their color and specials, planets are put around them. The chances of having something in a given orbit seems to depend only on the star kind. For each orbit, the chances of having something are independent. The "somethings" I am talking about are not just planets, but also asteroid fields and gas giants. For each orbit, you have the following chance of having something:

  • blue-white: 20%
  • white: 15%
  • yellow: 23%
  • orange: 25%
  • red: 15%
  • brown: 15%


Once you have something in orbit, there is 20% of getting an asteroid field, a 20% chance of getting a gas giant, and 60% of getting a planet.

If it is a planet, the size seems independant of other considerations (orbit, star kind, galactic age). Chances are:

  • tiny: 10%
  • small: 20%
  • medium: 40%
  • large: 20%
  • huge: 10%


I also assume that planet gravity and mineral richness depend only on the star color, which seems quite reasonable when checking the data. Notably, I verified that gravity appears to be quite independent of planet size. With that assumption we get the following table about chances of getting different levels of gravity:


low medium high
4.2 66.9 28.9 # Blue-white
10.6 70.1 19.3 # White
13.8 70.3 15.9 # Yellow
22.1 71.2 6.7 # Orange
29.6 66.2 4.2 # Red
13.6 77.3 9.1 # Brown


So, for example, planets at orange stars are 71.2% of the time of normal gravity, 22.1% low gravity, and 6.7% high gravity.

Update, Jan 12: hoserboy posted a comment noting that gravity is actually a function of planet size and richness. The gravity table is


Richness
UP P AVG R UR
Tiny l l l m m
S Small l l m m m
i Medium l m m m h
z Large m m m h h
e Huge m m h h h


The above table does not applies to homeworlds, orion, or other planets with monsters or specials.

There is a similar table for mineral richness:


upoor poor normal rich urich
0 0 39.7 41.6 18.5 # Blue-white
0 19.5 41.2 29.4 9.8 # White
0 30.3 40.4 20.7 8.5 # Yellow
10.4 40.2 39.0 10.3 0 # Orange
18.6 38.3 42.3 0 0 # Red
5.0 11.0 61.0 18.0 5.0 # Brown


The only missing aspect about planets is climate. Climate assignment depends on the galactic age, and on the kind of star. You can get probabilities for the different planet climates based on this table:

For average aged galaxies


# toxic radiated barren desert tundra ocean swamp arid terran gaia
16.3 48.6 27.2 6.9 0 0 0 0 0 0 # Blue-white
16.6 36.8 27.1 6.0 4.3 1.7 1.0 2.6 3.2 0.7 # White
12.7 26.8 30.2 5.9 7.7 4.4 3.8 3.1 4.2 1.2 # Yellow
16.7 17.4 22.8 8.2 7.1 5.7 6.9 6.3 7.5 1.4 # Orange
16.2 12.9 49.7 3.0 6.6 2.2 2.3 2.5 4.0 0.6 # Red
20.8 29.2 10.0 20.0 10.0 2.0 2.0 2.0 3.0 1.0 # Brown


For organic rich galaxies


# toxic radiated barren desert tundra ocean swamp arid terran gaia
13.0 37.0 22.2 26.7 .6 0 0 0 0 0 # Blue-white
7.1 25.5 20.6 21.3 6.3 2.2 3.5 6.4 6.4 .7 # White
8.8 17.5 17.6 15.9 13.8 6.4 5.8 6.2 6.0 2.0 # Yellow
7.0 10.7 15.0 11.9 17.3 9.2 7.9 10.0 8.1 2.9 # Orange
12.8 6.6 37.0 6.4 23.6 3.6 3.2 3.2 3.5 0 # Red
20.0 30.0 10.0 20.0 10.0 2.0 2.0 2.0 3.0 1.0 # Brown


For mineral rich galaxies


# toxic radiated barren desert tundra ocean swamp arid terran gaia
12.9 54.2 26.0 5.7 .7 0 0 0 0 0 # Blue-white
13.2 33.9 34.5 5.0 4.5 2.0 2.2 1.4 3.0 0 # White
13.5 23.0 30.9 6.7 7.0 4.9 3.0 4.0 6.3 .7 # Yellow
11.7 17.5 29.0 5.6 10.0 4.3 6.1 6.1 7.7 2.0 # Orange
17.4 14.0 45.2 4.1 8.7 2.8 2.0 1.8 3.7 0 # Red
20.8 29.2 10.0 20.0 10.0 2.0 2.0 2.0 3.0 1.0 # Brown


The last tables might be slightly biased because homeworlds were taken into account for the stats, and homeworld attributes are set after map generation. So probabilities for medium gravity, medium terran planets may be slightly higher than the real game values.

18.10.05

Maximum Population

Pop is the key factor in Master of Orion II. In this contribution I would like to illustrate the following computations:

How is the pop max value determined?

And how is this value affected by the Racepicks Aqua, Sub and Tol?

First, let us consider the different size classes:

1 = tiny, 2 = small, 3 = medium, 4 = large, 5 = huge

Starting point is the following consideration:
On a Gaia planet the entire surface is habitable and the max population value is then determined by:

(I) max popgaia= 5 * size class

(This relation applies in the current version but actually the formula is not used, you can modify these 5 gaia values separately.)

Thus 5 pop on a tiny gaia, 10 pop on small gaia up to 25 pop for a huge gaia. These 5 max pop gaia values are the so called size multipliers.

However, on planets with other climatic conditions only a smaller part of the entire surface is habitable. For a race without racepicks aqua and tol:

25%: Toxic, Radiated, Barren, Desert, Tundra, Ocean
40%: Swamp
60%: Arid
80%: Terran
100%: Gaia

These are the so called environment multipliers. Max pop is calculated by:

(II) max pop = size multiplier * environment multiplier

This value is then rounded.

How do the individual Racepicks affect this value now?

Aquatic
Aquatic simply means that Tundra and Swamp are rated as Terran and for Ocean as well as Terran the whole surface (like Gaia) is habitable.

25%: Toxic, Radiated, Barren, Desert
60%: Arid
80%: Tundra, Swamp
100%: Gaia, Terran, Ocean

Tolerant
This Pick means that you can use 25% of the surface additionally. The only exceptions of this 25% bonus are Terrans, since here only 20% of the surface was unused, as well as Gaias, since the entire surface was already usable on this planets.

50%: Toxic, Radiated, Barren, Desert, Tundra, Ocean
65%: Swamp
85%: Arid
100%: Terran, Gaia

Subterranean
This pick refers - as the name already points out - no longer to the surface. Additional area under the surface is available for the settlement. For each planet a bonus of 2 Pop per size class is added.

An overview:


To: Toxic
R: Radiated
B: Barren
D: Desert
Tu: Tundra
O: Ocean

The last column contains the environment multipliers (adjusted for tol and aqua). The product of 5 * environment multiplier is stated in the next to the last column (Sub-Races get a bonus of 2 to this product).

22.9.05

Growth Formula

Several factors (f.e. housing, racepicks, boom and techs) can influence the growth rate. To demonstrate the growth formula we will analyse these factors step by step:

Basic Growth (b)

Let us first define the following 3 variables:
POPRACE: Pop of the considered race
POPAGG: Aggregated Population of the planet (natives, droids, POPRACE and annexed pop)
POPMAX: Maximum Population of the planet

The Basic Growth (b) is then determined by:

(I) b
=trunc{[2000*POPRACE*(POPMAX-POPAGG)/POPMAX]^0.5}

This value b is always rounded down (truncated) before it is multiplied with a 2nd factor (a) which contains five bonuses:

(II) a=1+g+t+r+l+h

Without any further bonus g, t, r, l and h are all zero and the factor a is obviously 1. The summands of this factor are explained in the following:

GrowthPick (g)
-50% growth: g=-0.5
no growthpick: g=0
+50% growth: g=0.5
+100% growth: g=1

TechBonus (t)
microbiotics: t=0.25
universal antidote: t=0.5

RandomBonus (r)
Boom of 100%: r=1


LeaderBonus (l)
For example +30% medicine: l=0.3

Housing (h)
(III) h=PROD/(2.5*
POPAGG)
Of course, this just applies when you are housing.

So far, we have explained the product a*b. This value is again truncated. Additionally, we have the cloners which can generate growth:

Cloners
(c)
(IV) c=100*(POPRACE/POPAGG)

The growth formula is:

(V) GROWTH=trunc(a*b)+trunc(c)
Last but not least: Starvation - 50k pop are killed per missing food.

Or in detail:

(VI) GROWTH=trunc{(1+g+t+r+l+PROD/(2.5*POPAGG)) * trunc{[2000*POPRACE*(POPMAX-POPAGG)/POPMAX]^0.5}} + trunc{100*(POPRACE/POPAGG)}

What are the implications of these formulas?
(I) Basic Growth:
a) POPmax increases Basic Growth: The pop-multiplier tol, sub and aqua increase Basic Growth slightly.
b) With POPrace=POPagg the derivative supplies the following result:
Half full planets have the maximum basic growth.
b = [2000*POPRACE*(POPMAX-POPRACE)/POPMAX]^0.5 with POPrace=POPagg
db/dPOPrace = (2000-4000POPrace/POPmax)*0.5[2000*POPRACE*(POPMAX-POPRACE)/POPMAX]^(-0.5) and the first factor is zero when 0.5=POPrace/POPmax (half full planet)
c) droids/natives slow down: they just increase POPagg and db/dPOPagg is always negative.
d) When there is more than one race which can grow (i.e. a captured race and not natives or droids) the basic growth numbers are calculated separetely and just the sum is displayed. For an Uni race (without morale penalty) it isoptimal to mix the races.

Equations (II) and (III):
a) Surprisingly, the several bonuses were added. For example: Microbiotics improves the Growth by 50% for a -Growth Race because 0.75/0.5=1.5
b) housing is most important part.

(IV)
a) Cloners are inefficient when there are many droids on the planet.
b) You should not build cloners early on (almost empty) natives planet.

An alternative housing formula

I thought a lot about this topic recently. A few months ago I posted the growth formulas here and I will update this post soon. You see there a lot of variables. In the following just the both key factors (i.e. the Basic Growth b and the Housing Bonus h) are discussed. For simplification let us ignore truncation and let us assume that there are just Worker Units (lets denote them with w) on the planet, i.e. also no droids or natives etc. and therefore we have POPrace = POPagg = w and equation (I) in the above-mentioned blog post simplifies to:

(I) Basic Growth: b = SQRT [ 2000 * w * (POPmax - w) / POPmax ]

Let us clarify: 1 Worker Unit represents 1000k population and when the Basic Growth Rate bgr is mentioned I refer to this ratio:

(II) Basic Growth Rate: bgr = b / ( 1000 * w )

There are now 2 basic results with the current formula:

Half full planets generate the maximum Basic Growth, i.e. w = POPmax / 2 in equation (I).
But we receive the maximum Basic Growth Rate with w = 1 in equation (II).
(Be aware that we haven't considered housing yet.)

When we ignore now further bonuses (like growth picks, boom, microbiotics, leaders or cloners) we receive the total Growth tg by multiplying the Basic Growth b with the factor 1+h, where h represents the Housing Bonus:

(III) Total Growth: tg = (1 + h ) * b

and

(IV) Housing Bonus: h = Production / (2.5 * POPagg)

The Production contains the fixed Production pf (f.e. the 5 production of automated factories) and also the production caused by Worker Units. When we denote the productivity per worker with k and ignore pollution we receive:

(IVa) h = ( pf + k * w ) / (2.5 * POPagg)

Additionally, we assumed POPagg = w and (IVa) simplifies to:

(V) h (w) = (pf / 2.5) * w^(-1) + k / 2.5

Example:
An UniTolInd +1 (without any pollution)
Large abundant Terran: POPmax = 20
Autofacts and RoboMiners means pf = 15 and k = 10.5
so we have:
(I) BasicGrowth: b (w) = SQRT [ 2000 * w * ( 20 - w ) / 20 ]
(V) Housing Bonus: h (w) = 5 * w^(-1) + 4.2
and when we are housing the growth is calculated by:
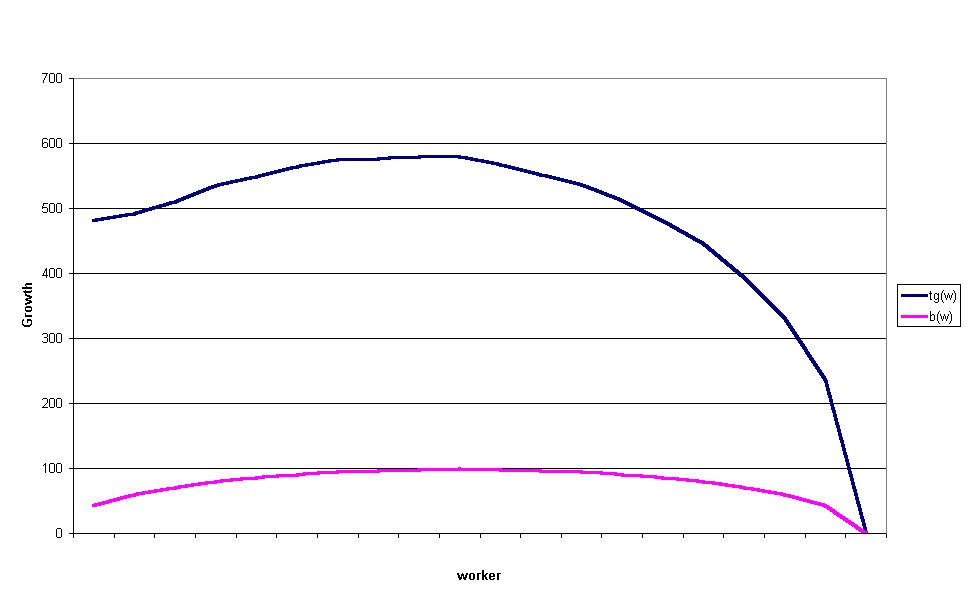
Total Growth: tg (w) = [1 + 5 * w^(-1) + 4.2 ] * SQRT [ 2000 * w * ( 20 - w ) / 20 ]

Here are the results of our example (click it to enlarge):

b(w) and tg(w) under the status quo Posted by Picasa

Surprisingly, the difference of tg (10) - tg (1) is almost completely explained by the increase in basic growth b (10) - b (1). In fact, the Housing Bonus h decreases with increasing w, i.e. the derivative
h'(w) = -5 * w^(-2)
is always below zero which is the mathematical reason why the slight increase in the Total Growth is driven by the Basic Growth.

This characterizes one part of the problem. When the first pop unit starts with housing the marginal contribution is quite big because of the fixed Production pf which is also used for housing.
So it seems to me necessary to exclude pf from the housing bonus:

(IVb) h = k * w / (2.5 * POPagg)

and again with POPagg = w we have h = k/2.5. One could argue that excluding pf makes economically sense. Improving growth is driven by government policies which are mainly based on subsidies (tax-reductions), services (kindergarten) etc. but not by the industrial complex. Housing itself seems an inapproriate expression - Childbearing (which was proposed by Cybersaber here) seems to fit better.
We receive now following results (click it to enlarge):

Pf removed Posted by Picasa

The graphs look better, after excluding pf the bonus h is constant now (it doesnt depend on w any longer) and you receive tg(w) by multiplying the basic growth with the factor 5.2. But nevertheless 1pop-housing is still the preferred solution when you decide to use housing:
A good indicator for an efficient housing strategy should be based on the ratio of the pop-increase tg(w) - b(w) = h(w) * b(w) and the invested production units.
We need a further decision when we calculate such ratio. What should happen with the deleted pf? There are several options:
a) This Prod is simply lost.
b) It is transferred to tradegoods (which means that roundabout three quarter of the prod is lost)
c) It is simply stored.
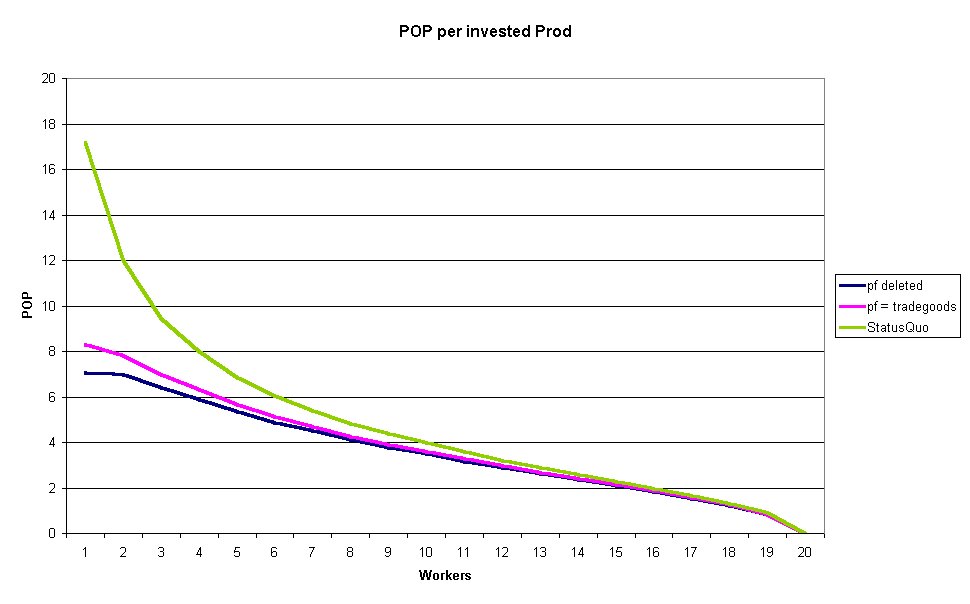
In the following diagram you see how this deleting of pf works compared to the status quo (click it to enlarge):

Pop per Prod Posted by Picasa

Under the status quo 1pop housing is by far the most effective choice. 1prod generates then roundabout 17k pop. When the pf is transferred to tradegoods it decreases to 10k and when we delete this prod just 7.1k pop per prod unit are left (1pop housing). What happens when we store this production? In this case we have the same efficiency as under the status quo.
It is not quite clear which is the approriate ratio here because there is still the alternative of basic growth. We surely have to test this in several games.

Summary: Deleting pf is not enough. We need further steps. A constant bonus h might work when we have a constant basic growth rate for some interval but as pointed out above we receive the maximum basic growth rate with w = 1. (see introduction)

Further Ideas:
We could remove POPagg from the housing bonus since the negative effect of POPagg is already considered in the basic growth function. For example, when we increase the denominator in (IVb) we get:

(IVc) h = k * w / 10

The graph looks now different (click it to enlarge):

Pf and POPagg removed Posted by Picasa

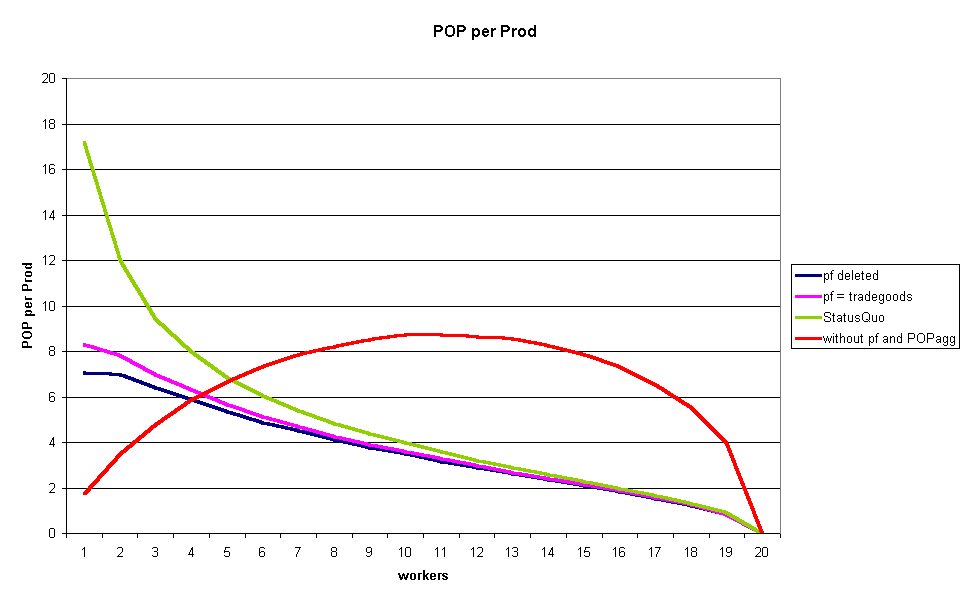
With an huge amount of prod you are then able to generate more than 1 pop unit per turn. Also the Pop per Prod ratio looks now very different (click it to enlarge):

Pop per Prod 2 Posted by Picasa

1pop housing is no longer the most effective choice. Instead of such dominant value we have now a wide range of acceptable housing decisions.
Is the maximum of 8.8k pop per prod a good value? With such a housing bonus we have a completely different game play. It is impossible to say. We need tests. I propose to test such functions with different parameters. (see below)
Does such change improve the AI? Once again. No idea at moment. I know for sure that the AI doesn't use 1pop housing systematically. When it uses housing with more than 1worker under the status quo the AI should be improved.

Further Parameters
Because of the above-mentioned difficulties it would be nice to test different housing and basic growth functions.

Instead of (IVc) I would propose a housing switch /h=a;b which determines the parameters in:
(IVd) h = ( k * w / b )^a
We receive (IVc) with the switch /h=1;10 then.
a should be a value between 0 and 1. (law of diminishing returns)
b should be positive

and instead of (I) a basic growth switch: /b=c;d;e could be useful:
(Ib) Basic Growth: b = 2000^c * {w^d * [(POPmax - w) / POPmax ]^(1-d)}^e
We receive (I) with /b=0.5;0.5;1

In this case the maximum Basic Growth is generated by w = d * POPmax
and the maximum Basic Growth rate: (e * d - 1 ) / ( e - 1 ) * POPmax
Furter, c is a good value to influence the basic growth for 1pop planets.
This should be sufficient to find a good alternative formula.

31.8.05

Corrupted Maps revisited

Recently, I analyzed the subspace comm range issue a bit. Cabman and AlexD pointed out that subspace comm has less range than the manual and online help suggest. I figured out now that this problem is related to the so called "corrupted maps":

The main map is a grid. Let us assume there are two systems with these coordinates:

System A (Xa|Ya)
System B (Xb|Yb)

(Lord Brazen illustrates here the info of the star table. I used mapleveller to read and alter the save game info for the following examples.)

The distance formula d (A, B) of the F9-Parsec-Display is based on the Euclidean distance, this value is divided by 30 and then rounded up:

(I) d (A, B) = round up [ sqrt { (Xa-Xb)^2 + (Ya-Yb)^2 } / 30 ]

(Rounding up makes sense: When the exact value is 4.5 parsecs we just want the info that we need at least 5 parsecs/turn to cover this distance in one turn.)

The same formula d (A, B) is applied to measure the Subspace Comm Range. The manual states:

This upgrade to all your relay stations gives you the ability to issue orders to any friendly ship within 6 parsecs.

Let us assume system A contains a relay station and B reflects the coordinates of the fleet:
d (A, B) = 5 means then that the fleet is in subspace comm range and
d (A, B) = 6 means that the fleet is out of subspace comm range.

With respect to this function d (A, B) there are now two strange results:

1. Why does it happen that a fleet leaving system A with anti-matter drive (and no navi) is out of subspace comm range the next turn?
2. Why does it happen that a fleet with ion drive (and no navi) sometimes just needs one turn to cover a distance of 5parsecs (according to F9-Info on main map)?

Actually, the answer of these both questions is the same: Rounding. The fleets are also attached to (X/Y)-Positions in the save and each turn a rounding occurs to receive a position on the grid. When you move from System A to B the new coordinates of your fleet are calculated by:

(II) (X|Y) = (Xa|Ya) + round up { (Xb-Xa|Yb-Ya) * c }

The factor c is the rounded travel proportion to receive a intersection on the grid:

(III) c = min { 1; parsec per turn * 30 / round down [ sqrt { (Xa-Xb)^2 + (Ya-Yb)^2 } ] }

Combined we receive:

(IV) (X|Y) = (Xa|Ya) + round up { (Xb-Xa|Yb-Ya) * min { 1; parsec per turn * 30 / round down [ sqrt { (Xa-Xb)^2 + (Ya-Yb)^2 } ] } }

A few examples:
System A is (always) at position (505|370) now and a fleet with anti-matter drive (5 parsecs per turn) leaves that system to direction B:

a) System B is at (505|520) and we receive then:
(I) d (A, B) = round up [5] = 5 (is even unrounded exactly 5. System B is exactly below A - same X-Position - and no rounding occurs)
(III) c = 1
and therefore:
(IV) (X|Y) = (505|370) + (0|150) * 1 = (505|520)
The fleet needs 1 turn to move from A to B.

b) Let us change the Y-Position slightly (+1). System B is now at (505|521):
(I) d (A, B) = round up [ 5.03333333] = 6 (6 parsecs is displayed on the main map now - f9)
(III) c = 150/151 = 0.993377
and after 1 turn the fleet is still at:
(IV) (X|Y) = (505|370) + round up [ (0|151) * (150/151) ] = (505|520)
The fleet needs 2 turns to move from A to B.

c) Now same Y-Position like example a) but now a different X-Position (+29). System B is now at (529|520):
(I) d (A, B) = round up [5.06359556] = 6
(III) c = 150/151 = 0.993377
and after 1 turn:
(IV) (X|Y) = (505|370) + round up [ (24|150) * (150/151) ] = (529|520)
The fleet needs just 1 turn to move from A to B. (so called corrupted map because 6 parsecs distance is displayed on main map)

d) Let us change the X-Position a bit further (compared to example c). System B is now at (530|520):
(I) d (A, B) = round up [ 5.06896878] = 6
(III) c = 150/152 = 0.986842
and after 1 turn the fleet is still at:
(IV) (X|Y) = (505|370) + round up [ (25|150) * (150/152) ] = (530|519)
The fleet needs 2 turns to move from A to B.

The SubspaceComm-Issue
Look again at examples b) and d) where the fleet is in hyperspace after the first turn.
In example b) the fleet position (505|520) is exactly 5 parsecs away from system A. And therefore it is in subspace-comm range.
In example d) the euclidean distance is 5.036 parsecs. This value is rounded up to 6 parsecs (see (I)) and the fleet is out of subspace-comm range.
Case b) where no rounding occurs should happen very rarely.

Therefore: A fleet which leaves system A with anti-matter drive (and no navi) is almost always out of subspace comm range the next turn because it is generally a bit faster than 5 parsecs/turn.

Before I figured out the math I thought that the subspace comm issue is just a very late rule change (not mentioned in manual or online help). But it seems now clear that the missing parsec was not intended by the game designers - these rounding issues have been overlooked. Imho it is therefore a bug and should be fixed. There are several options. So far it is only brainstorming, but replacing (IV) with equation (V) looks interesting:

(V) (X|Y) = (Xa|Ya) + round down { (Xb-Xa|Yb-Ya) * min { 1; parsec per turn * 30 / round up [ sqrt { (Xa-Xb)^2 + (Ya-Yb)^2 } ] } }

With this change subspacecomm would work correctly. Also the corrupted maps issue would be affected by this change. It is no longer possible to be faster than expected but slower. (Probably an advantage for the defenders.)

12.8.05

Combat Speed

There is some interesting discussion on LBs forum about the so called battlepods "bug":

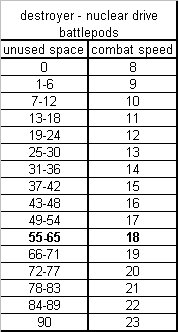
To illustrate dirt-bag's proposal look at the combat speed table (click it to enlarge):


Combat Speed Posted by Picasa

These are the EXE-values dirt-bag refers to. You see that the difference between minimum and maximum speed - the maximal unused space speed bonus - is always 10. This table does not include the battlepods effect or augmented engines. Some examples how this bonus works:

I. Status quo

a) destroyer - nuclear drive
the destroyer has 60 space avaiable which we will define as hull size.


DD nuclear drive Posted by Picasa

So we have:

(I) combat speed = minimum combat speed + unused space bonus

and

(II) unused space bonus = round up [10 * ( unused space / hull size )]

combined

(III) combat speed = minimum combat speed + round up [10 * ( unused space / hull size )]

b) destroyer - nuclear drive - megafluxers
Before we look at the battlepods issue let us see how megafluxers work. Them maximum unused space is now 75. The space increase is abbreviated with dM and it is added to the hull size in (II) and (III). So we have now:

(IV) combat speed = minimum combat speed + round up [10 * ( ( unused space ) / ( hull size + dM) )]


DD megafluxers nuclear drive Posted by Picasa

Results:
Maximum combat speed is unchanged. (sounds logical)
Minimum combat speed is unchanged. (counterintuitive)
A DD (which has before and after researching megafluxers the same space consumption) has on average a speed increase of 1.05. (Values vary from 0-2)

c) destroyer - nuclear drive - battlepods
Let us now analyze the battlepods (without megafluxers).

DD battlepods nuclear drive Posted by Picasa

For the first 60 unused space units the equation (II) and the table under b) destroyer - nuclear drive - megafluxers were applied. When there is even more unused space the battlepods bonus comes into play again:

(V) battlepods bonus = round down [10 * dB / hull size ] * round down [ (unused space-60) / dB ]

Results:
Maximum combat speed increases beyond 18. (extremely counterintuitive. That is the main problem we want to solve here.)
Minimum combat speed is unchanged. (counterintuitive)
A DD (same space consumption) has on average a speed increase of 4.59 caused by battlepods. (Values vary between 4-5)

d) destroyer - nuclear drive - battlepods + megafluxers
The results are now a bit incosistent. You cant describe them by "more space=more speed" any longer.

DD battlepods & megafluxers nuclear drive Posted by Picasa

For the first 75 unused space units the equation (IV) and the table under b) destroyer - nuclear drive - megafluxers were applied. When there is even more unused space a further battlepods bonus comes into play:

(VI) battlepods bonus = round down [10 * dB / ( hull size + dM ) ] * round down [ (unused space-75) / dB ]

The megafluxers increase dM is added to the hull size. Therefore some empty battlepods ships even slow down when you research megafluxers.
The maximum combat speed (22) is lower here than under c). (inconsistent)

II. Megafluxers solution for Battlepods
One idea to solve the problem seems straightforward to me. Battlepods should influence the combat speed like megafluxers. Equation (V) is then replaced by

(VII) combat speed = minimum combat speed + round up [10 * ( ( unused space ) / ( hull size + dB ) )]

and instead of (VI) following equation is used:

(VIII) combat speed = minimum combat speed + round up [10 * ( ( unused space ) / ( hull size + dB + dM ) )]


Battlepods-"bug" removed Posted by Picasa

Results:
Maximum combat speed stays at 18. (sounds now logical)
Minimum combat speed is unchanged. (still counterintuitive)
A DD (same space consumption) has on average a speed increase of 1.69 caused by battlepods. (Values vary between 0-4)

III. Reducing unused space bonus
Another idea is quite easy to realize and it is one of dirt-bag's preferred solutions. Simply reducing the maximal unused space speed bonus. So far, it was always 10 in the above-mentioned examples. With a maximum of 2 we receive following results (click it to enlarge):


Reduced Unused Space Bonus Posted by Picasa

Results:
Maximum combat speed stays almost at 10. (battlepods-bug almost completely resolved)
Minimum combat speed is unchanged. (still counterintuitive)
A DD (same space consumption) has on average a speed increase of 0.52 caused by battlepods. (Values vary between 0-1)

Other values than 2 are also an option (especially when combined with Solution II.). A switch which determines the unused space bonus would be a nice option to test different values.

IV. Space Consumption Model

a) Introduction

So far we had formulas which were based on unused space. Such formulas work fine as long as hull size is constant. But with space increases (like megafluxers or battlepods) we had a lot of fuzzy results. As long as unused space is our key variable there is no workaround to solve all the different problems at the same time. But there is a simple space consumption model with imo convincing results. Replace equation (I), (II) and (III) with:

(IX) combat speed = maximum combat speed - space consumption malus

and

(X) space consumption malus = round down [(10/1.5) * ( consumed space / hull size )]

combined

(XI) combat speed = maximum combat speed - round down [(10/1.5) * ( consumed space / hull size )]

The denominator 1.5 achieves that a full battlepod ship will have the same speed as under the status quo. The value reflects the battlepod increase (HS+dB)/HS. This value 1.5 works for dd-doomstar, for a ff the exact value 37/25 should be used.

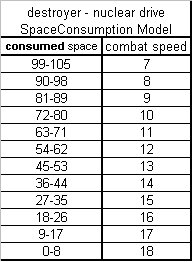
No further formula is needed. Battlepods or megafluxers don't change the formula - they just increase the potential to consume more space. Therefore we need just one table to display all results (incl. battlepods, megafluxers or battlepods+megafluxers):


Space Consumption Model Posted by Picasa

Results:
a) an empty destroyer has always combat speed 18. (convincing.)
b) a full destroyer (without bp or m) is now a bit faster than under the status quo (combat speed 12).
c) a full destroyer with battlepods has still the status quo-speed. (8)
d) a full bp-destroyer is therefore slower than a full non-bp-destroyer. (convincing)
e) A DD (same space consumption) has never a speed increase caused by battlepods or megafluxers. (convincing, or at least no completely unconvincing speed changes)

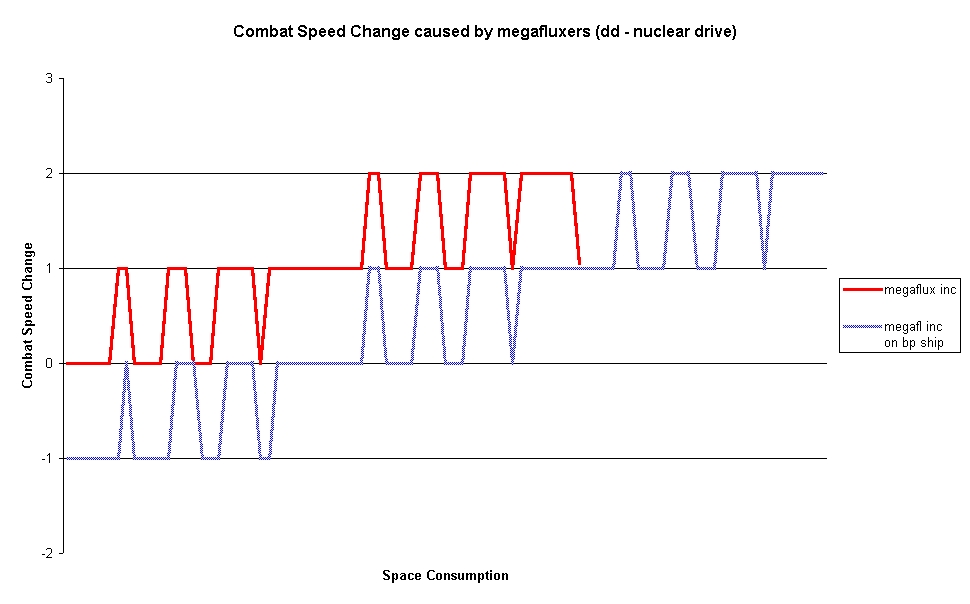
Compare the last point with the megafluxers effect under the status quo:

megafluxers speed change Posted by Picasa

Let us assume we have same design and just add megafluxers:
For a non-bp ship see the red graph. (Space consumption 0-60)
BP ship the blue graph. (Space consumption 0-90) There is even the above mentioned speed decrease.

The speed decrease will be eliminated in a pure megafluxers solution (solution II) but results similar to the red graph will persist. And IMO there is no convincing explanation for such behaviour. IMO solutions based on space consumption models (solution IV) should be the way to go.

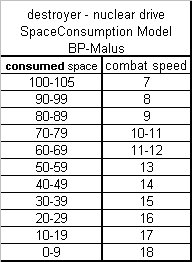
b) Implementing a battlepods malus

I propose to implement the bp-extra malus (dirt bag's idea here) in the following way:

Just change the factor (10/1.5) to 9/1.5=6
(Once again, for a ff the exact value 37/25 should be used.)

So instead of (XI) we have:

(XII) combat speed = maximum combat speed - round down [6 * ( consumed space / hull size )] and -1 when bps are used.


SC Model with BP-Malus Posted by Picasa

61-75 depends on battlepods.
0-60 using battlepods is inefficient.
76-105 using them is necessary.

Adding BPs and consuming the extra space is always a loss of 4 combatspeed and -20 beamdefence then.

c) Implementing an unused space bonus reduction

Dirt-bag's observation is correct that this new model doesn't solve the runner-problem completely. But there is a simple way to implement such idea (solution III), which just reduces the maximum combat speed (and not the speed of a full battlepod ship):

(XIII) combat speed = maximum combat speed - C - round down [(9-C)/1.5 * ( consumed space / hull size )] and -1 when bps are used.

(Once again, for a ff the exact value 37/25 should be used.)

The best example to illustrate the runner problem is IMHO a ff on iondrive level. In the following table (click it to enlarge) you see the results for different C-Values (0-9):


SpeedDecreaseSCModel Posted by Picasa

In the red row at top you see the maximum speed decrease. The lower red row shows that the speed for a full bp-ff is unchanged. The beige row is important for aug eng ffs. (aug eng consumes 10 space). Just add 5 combat speed to this row and you receive the combat speed of these runners.

According to dirt-bag a runner with 22 combat speed is unable to outrun a fast nuke (on iondrive-lvl 18 speed). The C-Value of 7 should be his preferred solution then.